My socks are worked on one circular needle, always toe-up and always with short row no-wrap heels. The toes - I either do short row no wraps or Turkish Cast On and Make-One shaping. All the terms I use are referenced at the bottom.
I'd no idea how hard it would prove to be to write down what I knit so easily so if you find any mistakes, please tell me.
You need to read it in conjunction with the various references and explanations!!
Pattern Outline for Toe-Up Socks.
I use one 80cm circular needle and cast on 12 sts using the Turkish Cast On. After working 2 rounds straight I work two rounds increasing at each end of the needles (16sts on each needle)- Make One leaning to Right at beginning of row and Make one leaning to Left at end of row. Continue the increases on alternate rounds to 30 sts on each needle - or as required for your foot. I always increase after the first st at the beginning of the row and just before the last stitch at the end.
Start working in your pattern on the top of the foot and stocking stitch on the sole.
I start my heel shaping about 2 1/2" from the back of my heel (try it on). About 4 rows before I shape the heel I increase at each end of the needle on alternate rows on the sole side only to give me 4 extra stitches to work the heel. It makes the heel slightly deeper and for me gives a better fit.
The heels are worked flat in rows of stocking stitch back and forward on the sole stitches only, decreasing with short row shaping down to 12 "live" stitches. Then start the short row increases to incorporate all the stiches again. I have described my no-wrap short rows in great detail and with pictures here.
Continue working in rounds, decreasing those extra 4 stitches over the next 2 alternate rows on the sole side. And now you can start patterning all round the sock.
Work in pattern until the required length and then work a rib. My preferred rib is 2x2 and I use one size larger needle because I don't like it at all tight.
Cast off loosely. I use the lace cast off where you work 2 stitches in pattern, slip them back to the LH needle and knit them together in back.* Work next stitch in pattern, slip these 2 sts back and knit together. Continue from * to end.
Variations
As an alternative to the Turkish Cast On I use a Provisional Crochet Cast On and knit 4 rows stocking stitch before picking up the stitches on the chain.
And the method that was my favorite until a few weeks ago is to work the toe as a short row toe.
To do this you start with an Invisible Cast On or Provisional Crochet Cast On and cast on half the number of stitches you need for your sock. For me that is 60 stitches so I cast on 30. Start knitting the short row toe in exactly the same way as the heel and when you are ready to start knitting in the round you just pick up the stitches on the spare circular or waste yarn. I have described this in detail and with pictures here.
Description of Terms
Turkish Cast On
This is described beautifully by Fluffy Knitter here.
Invisible Cast On
I love Priscilla Gibson-Roberts' method and description for the invisible cast-on in"Simple Socks" p46 or you can follow these instructions
Provisional Crochet Cast On
I follow Lucy Neatby's instructions for this in "Cool Socks Warm Feet" p110 or instructions here with a video
Make Ones Leaning to Left or Right are described in Priscilla Gibson-Roberts "Simple Socks" book p 58
Make One Leaning to Left:
Lift bar (between last stitch worked and next stitch) with the right needle and place it on the left needle so that the RH edge of this loop is at the front of the LH needle and knit it through the back. This makes a twisted stitch and therefore no hole.
Make One Leaning to Right:
Lift bar (between last stitch worked and next stitch) onto the left needle so that the RH edge of this loop is at the back of the needle and knit into the front, making a twisted stitch and no hole.
Short Row No-Wrap
My short row no wraps are based on Montse Stanley's method for Mitred Corners in her Knitter's Handbook p103. And it is almost the same as "Knit Encroachment " and "Purl Encroachment " described here
This is what I do:
Short row decreases:
Slip first stitch, work to the stitch before the end or the stitch before the marker. Don't wrap, just turn. Place a marker on the RH needle. Slip first stitch, work to one stitch before the marker. Turn. Place marker on RH needle. Continue like this working one stitch less each time until there are 10 - 12 stitches between the markers and begin short row increases.
Short row increases:
*Slip the first stitch, work to stitch before the marker, slip this stitch to the RH needle, discard the marker and put the slipped stitch back to the LH needle and work it together with the head of the stitch below the next stitch (knit together through the back on knit rows and just purl together on purl rows). Turn. Repeat from * until all the markers have been discarded and continue knitting in the round.
I have described this in minute detail with lots of pictures here. And a complete sock is described here - you can leave the lace out completely or put a pattern of your own in if you don't want the lace.
For more help consult Lauri B's Toes and Heels page .
Edited to add missing abbreviation section.
Showing posts with label pattern. Show all posts
Showing posts with label pattern. Show all posts
Saturday, 2 June 2007

Wednesday, 21 March 2007
Kiss Cross Sock
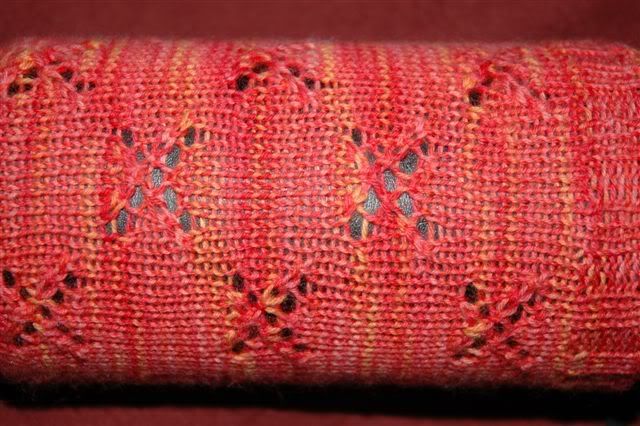
This is the lace chart- "XP7"- worked over 7 stitches and 10 rows
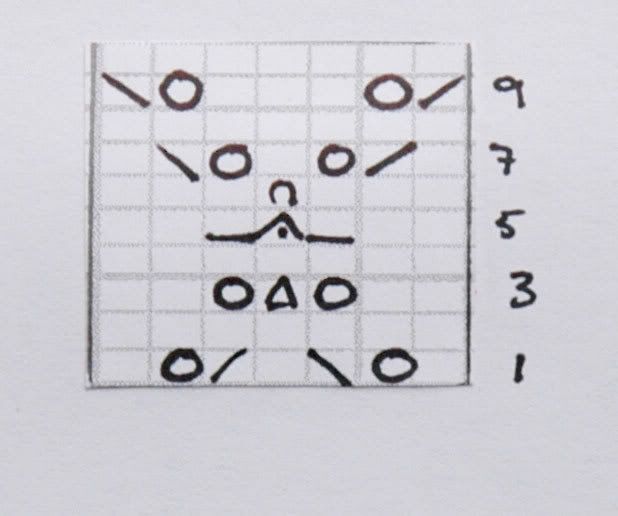
with the standard abbreviations
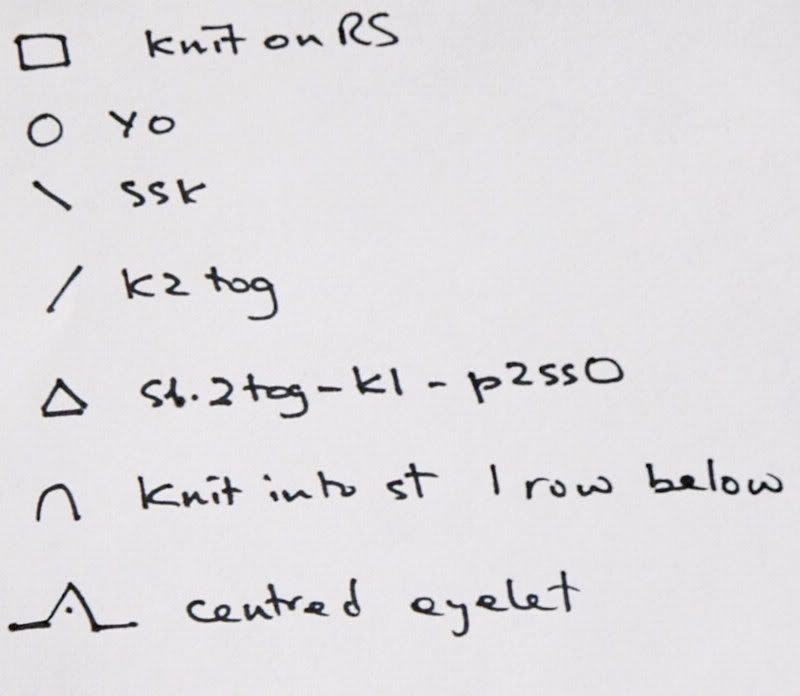
except for the Amy Detjen's centred eyelet which I first saw in "A Gathering of Lace" by Meg Swanson. All the blank squares are knit because you are working in the round with the exception of the next row stitch immediately above the centred eyelet - for this stitch you knit into the actual hole of the row below.
Amy's Centred Eyelet
This is worked over three stitches and leaves three stitches.
Slip the first stitch knitwise, begin to knit the next stitch but don't slip it off the LH needle. Pass the slipped stitch over the partial knit, Yarn Over, Knit 2 together (the remains of the partial knit stitch and the 3rd stitch). This completes the centred eyelet.
On the next row the stitch above this eyelet hole is knitted into the row below.
ETA On re-reading this I felt it needed a little clarification. These two links will help.
(Scroll half-way down in this first one)
http://www.schoolhousepress.com/kalpansyshawl.htm
and for a wonderful "deconstruction"
http://mathomhouse.typepad.com/bluestocking/2005/10/deconstructing_.html
Sock Notes
I used yarn from the YarnYard on Addi Turbos 2.5mm, 80cm with 60 stitches. The sock construction is exactly the same as my lace socks in the previous post.
Starting toe-up, after completing the toe part I arranged the stitches so that I had 28 sts on top and 32 underneath then I started the pattern for the top like this:
k4, XP7, k7, XP7, k3 and the underneath completely plain. Work the 10 rows of the chart followed by 4 rounds stocking stitch then:
k11, XP7, k10. Work the 10 chart rows and then another 4 rounds plain. Continue like this until its time to work the heel. Adjust the sts after the heel so that you have 56 stitches in total.
You do the leg in the same way except you need the pattern on both halves so you just continue the [k4, XP7, *k7, XP7 repeat from* to last 3 stitches, k3 ] pattern all round with 4 rounds straight after the chart rows. Now the only slight complication is that to avoid having the XP7 pattern at the beginning or end of the needles I just moved 3 stitches from the end of each needle to the beginning of the next.. It's obvious when you come to it BUT put a marker so that you know where the round starts then you continue with the XP7 pattern making sure the crosses are worked above the seven knit stitches to make the criss-cross pattern.
This sounds really complicated but I think it's my poor descriptive technique because it wasn't hard at all.
Please if you find any errors, let me know. I feel thoroughly confused myself now.
Monday, 5 February 2007
Toe-Up Lacy Sock
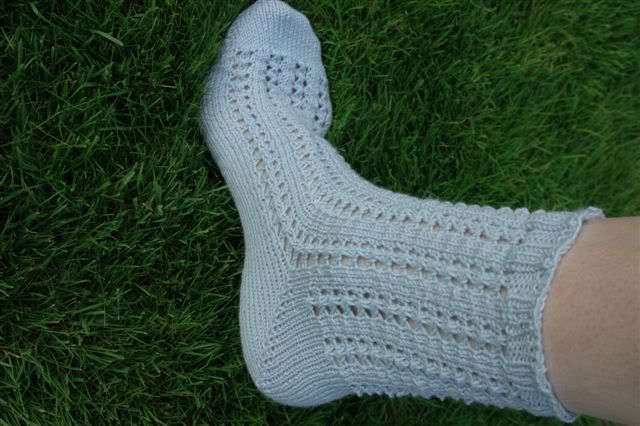
This is an easy eyelet pattern sock worked from the toe up on one circular needle. I use short row heels and toes that don't require wrapping, but you can substitute any other short row you prefer.
Gauge 8sts per inch
Needle Size US1 / 2.5mm circular length 80cm
Materials Rowan 4ply Soft Shade 370 2 x 50g balls, 20 stitch markers (optional)
Size Women's medium
Pattern Notes
All slipped stitches in the short rows are slipped purl-wise.
I find it easier to keep my place in the short rows if I use stitch markers.
Instructions
Cast on 32 sts with a 2.5mm circular needle using the provisional method with a smaller circular needle instead of the waste yarn.
Short-row toe
Row 1: k 31, turn, place marker on RH needle
Row 2: sl 1, p29, turn, place marker on RH needle
Row 3: sl 1, k to 1 st before marker, turn,place marker on RH needle
Row 4: sl 1, p to 1 st before marker, turn,place marker on RH needle
(Make sure the yarn stays at the back when you slip the first st on the knit rows and at the front on the purl rows)
Repeat rows 3 and 4 until there are 10 markers each end and 12 sts between the markers
Short-row back
Row 1: sl 1, k to 1 st before marker. Slip this st to RH needle, remove marker. Insert tip of RH needle (from right to left) into nub below next st on LH needle. Put tip of LH needle into these 2 sts and knit them tog. (through the back) leaving the nub-less st unworked on the LH needle. Turn
Row 2: sl 1, p to 1 st before marker. Slip this st to RH needle, remove marker. Insert RH needle tip into nub below next st. Put LH needle into the back of these sts and purl them tog. Turn.
Make sure the nubless st stays on the needle - it will try to slip off!
Continue until only one marker is left at each end.
Next row: sl 1, k to st before marker. Slip this st to the RH needle while you remove the marker then replace the stitch on the LH needle and knit it and the last st together. Turn and slide all these sts onto the cord pulling the needle through ready to knit the spare sts and begin working in rounds.
Slide the spare sts on the waste yarn to a needle,correcting the orientation of the sts, undo the knot, knit the first 2 sts tog and k to the last 2 sts, k2tog. Turn and pull the stitches onto the cord.
Now the stitches facing you are the ones where you've just finished working the short rows and you still have a marker on the end of these. Slide these stitches to the end of the needle and the back needle is ready to work the next round. Pull it out far enough to be comfortable and hold the last st on cord at the back close to the first st on the front needle. Slip the first st to the RH needle while you discard the marker, then slip it back and knit it together with the next st. Knit to end. 60sts
The toe is complete.
Knit 2 rounds then start the lace pattern. Decide which side of your sock you want for the top and work the lace section here, keeping the underneath as plain knitting.
Lace pattern:
Round 1 - Needle 1: k2, ( yf, sl 1, k2tog, psso, yf), * k3, (yf, sl 1, k2tog, psso, yf ) ; rep from * to last st, k1
Round1 - Needle 2: k
Round2 - Needles 1 & 2: k
Round3 - Needles 1 & 2: k
Round4 - Needles 1 & 2: k
Work until sock measures 7 1/2" from tip of toe ending with the knit side facing for the next row. Now ignore the lace side of the sock but keep a note of where you are in the pattern and start working in rows for the heel.
Short-Row Heel
This is almost identical to the toe but I like to have extra stitches for the heel to make it slightly deeper and I think it gives a better fit.
Transfer 2 sts from each end of the lacey part onto the knit part and begin working in rows. (34sts)
Row 1: k 33, turn, place marker on RH needle.
Row 2: sl 1, p 31, turn, place marker on RH needle.
Row 3: sl 1, k to st before marker, turn, place marker on RH needle.
Row 4: sl 1, p to st before marker, turn, place marker on RH needle.
Repeat rows 3 and 4 until 14 sts remain between markers.
Short-row back
Row 1: sl 1, k to 1 st before marker. Slip this st to RH needle, remove marker. Insert tip of RH needle (from right to left) into nub below next st on LH needle. Put tip of LH needle into these 2 sts and knit them tog. (through the back) leaving the nubless st unworked on the LH needle. Turn
Row 2: sl 1, p to 1 st before marker. Slip this st to RH needle, remove marker. Insert RH needle tip into nub below next st. Put LH needle into the back of these sts and purl them tog. Turn.
Continue working these 2 rows until the last marker has been discarded. Turn,sl 1 and work to end of row, slipping last 2 sts back onto lace section. Now transfer 2 sts from the other end back to the lace section too, giving 30 sts on both sections.
Now you're ready to continue the lace pattern on the front of the sock from where you left off. I like to work with the lacey part just on the front for about 1/2" - 1" before starting the lace up the back of the leg.
The pattern is just the same:
Round 1(both needles ):k2, ( yf, sl 1, k2tog, psso, yf), * k3, (yf, sl 1, k2tog, psso, yf ) ; rep from * to last st, k1
Rounds 2, 3 and 4(both needles) : K
Work in this pattern until lace section at back measures 4 1/2".
Next round: k2, *p3, k3. Repeat from * to last st, k1. Work in this rib for 3/4". Cast off loosely.
Notes
This type of sock construction and the cast-on are described in Priscilla Gibson-Roberts' book "Simple Socks" and Wendy Johnson gives an excellent account of a toe-up sock although neither of these use an unwrapped short row like mine here.
Instructions are given for working on one circular needle. More information on this method can be found at http://www.az.com/%7Eandrade/knit/mloop.html
For the provisional-cast on see any standard knitting reference book or here
The no-wrap short rows are based on the method used in Oz Yarn's Easy Sock.
Knitting the "nub"
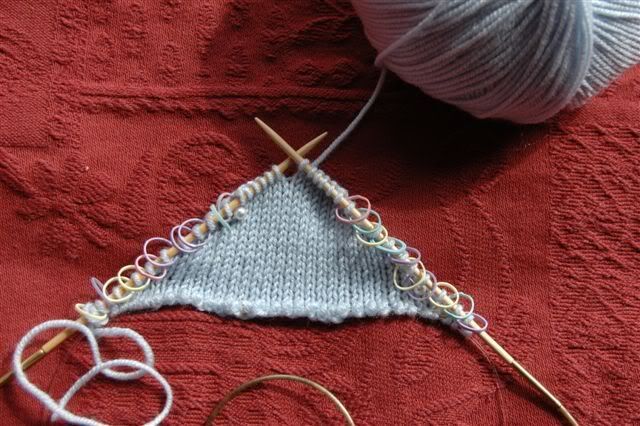 Half-way through the short row toe and ready to start to short-row back. You can see the 10 markers on each side and 12 stitches between the markers.
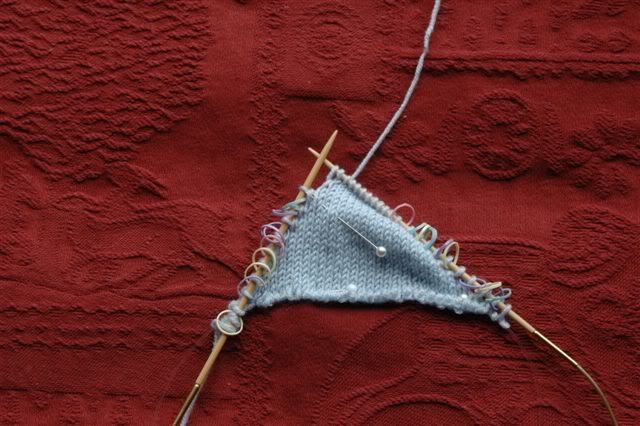 The last stitch before the marker has been slipped to the RH needle and the marker has been discarded. The pearl headed pin tip is just under the "nub"
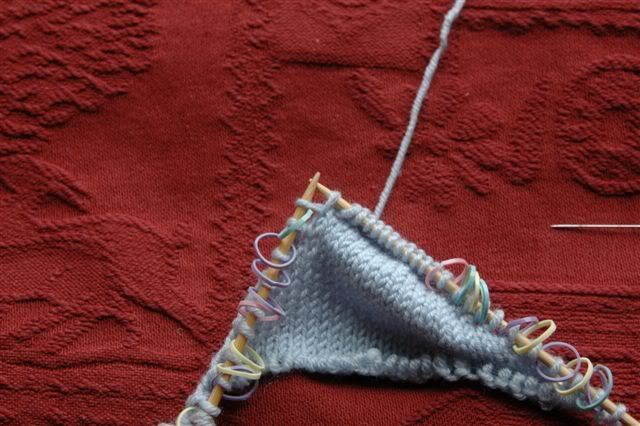 The "nub" is on the RH needle
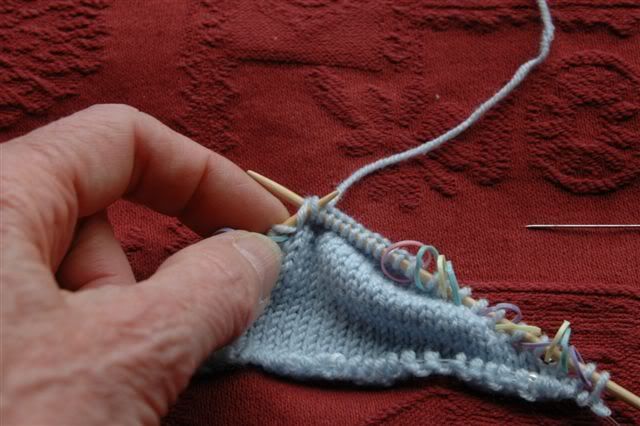 The "nub" and the slipped stitch are being knitted together through the back
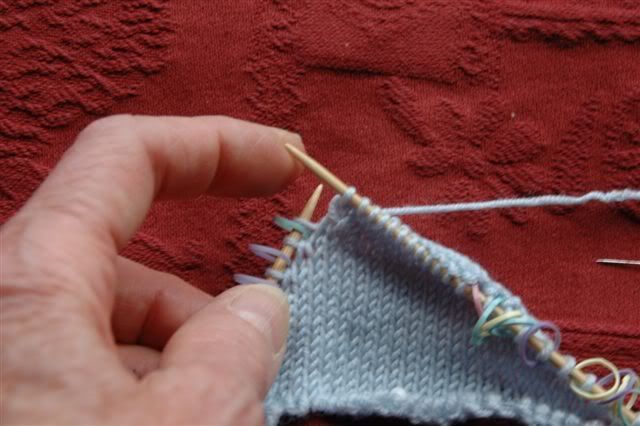 Knit 2 together has been completed ready to turn.
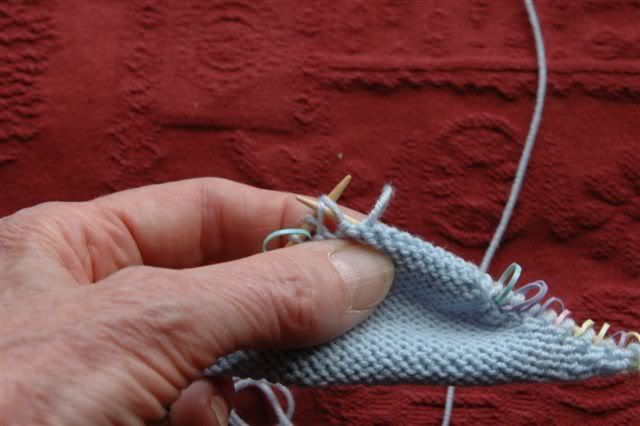 The "nub" and slipped stitch being purled together on a purl row
Since writing this I have found that although the sock construction is completely different, the lace pattern I used is the same as Karen Baumer's Simply Lovely Lace Socks in Interweave Knits Spring 2006 except she does "knit through back of stitch" where I just do "knit" but I took mine from this that I knitted for my daughter last summer
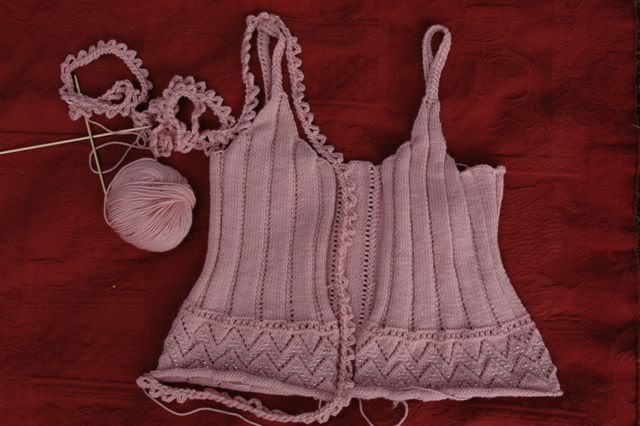
It is Sundae fromRYC Classic Holiday and I adjusted the stitches between the columns of eyelets to fit my sock.
Subscribe to:
Posts (Atom)
