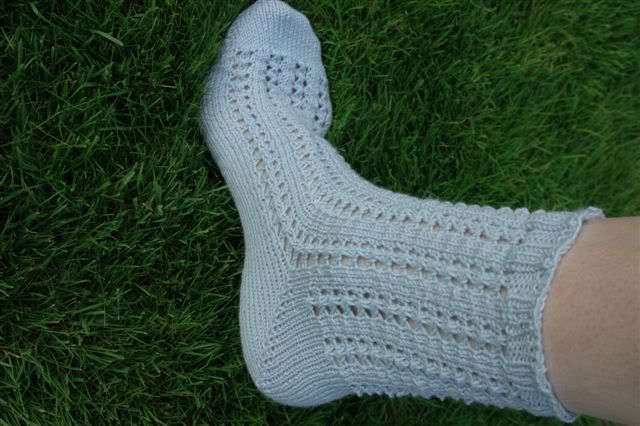
This is an easy eyelet pattern sock worked from the toe up on one circular needle. I use short row heels and toes that don't require wrapping, but you can substitute any other short row you prefer.
Gauge 8sts per inch
Needle Size US1 / 2.5mm circular length 80cm
Materials Rowan 4ply Soft Shade 370 2 x 50g balls, 20 stitch markers (optional)
Size Women's medium
Pattern Notes
All slipped stitches in the short rows are slipped purl-wise.
I find it easier to keep my place in the short rows if I use stitch markers.
Instructions
Cast on 32 sts with a 2.5mm circular needle using the provisional method with a smaller circular needle instead of the waste yarn.
Short-row toe
Row 1: k 31, turn, place marker on RH needle
Row 2: sl 1, p29, turn, place marker on RH needle
Row 3: sl 1, k to 1 st before marker, turn,place marker on RH needle
Row 4: sl 1, p to 1 st before marker, turn,place marker on RH needle
(Make sure the yarn stays at the back when you slip the first st on the knit rows and at the front on the purl rows)
Repeat rows 3 and 4 until there are 10 markers each end and 12 sts between the markers
Short-row back
Row 1: sl 1, k to 1 st before marker. Slip this st to RH needle, remove marker. Insert tip of RH needle (from right to left) into nub below next st on LH needle. Put tip of LH needle into these 2 sts and knit them tog. (through the back) leaving the nub-less st unworked on the LH needle. Turn
Row 2: sl 1, p to 1 st before marker. Slip this st to RH needle, remove marker. Insert RH needle tip into nub below next st. Put LH needle into the back of these sts and purl them tog. Turn.
Make sure the nubless st stays on the needle - it will try to slip off!
Continue until only one marker is left at each end.
Next row: sl 1, k to st before marker. Slip this st to the RH needle while you remove the marker then replace the stitch on the LH needle and knit it and the last st together. Turn and slide all these sts onto the cord pulling the needle through ready to knit the spare sts and begin working in rounds.
Slide the spare sts on the waste yarn to a needle,correcting the orientation of the sts, undo the knot, knit the first 2 sts tog and k to the last 2 sts, k2tog. Turn and pull the stitches onto the cord.
Now the stitches facing you are the ones where you've just finished working the short rows and you still have a marker on the end of these. Slide these stitches to the end of the needle and the back needle is ready to work the next round. Pull it out far enough to be comfortable and hold the last st on cord at the back close to the first st on the front needle. Slip the first st to the RH needle while you discard the marker, then slip it back and knit it together with the next st. Knit to end. 60sts
The toe is complete.
Knit 2 rounds then start the lace pattern. Decide which side of your sock you want for the top and work the lace section here, keeping the underneath as plain knitting.
Lace pattern:
Round 1 - Needle 1: k2, ( yf, sl 1, k2tog, psso, yf), * k3, (yf, sl 1, k2tog, psso, yf ) ; rep from * to last st, k1
Round1 - Needle 2: k
Round2 - Needles 1 & 2: k
Round3 - Needles 1 & 2: k
Round4 - Needles 1 & 2: k
Work until sock measures 7 1/2" from tip of toe ending with the knit side facing for the next row. Now ignore the lace side of the sock but keep a note of where you are in the pattern and start working in rows for the heel.
Short-Row Heel
This is almost identical to the toe but I like to have extra stitches for the heel to make it slightly deeper and I think it gives a better fit.
Transfer 2 sts from each end of the lacey part onto the knit part and begin working in rows. (34sts)
Row 1: k 33, turn, place marker on RH needle.
Row 2: sl 1, p 31, turn, place marker on RH needle.
Row 3: sl 1, k to st before marker, turn, place marker on RH needle.
Row 4: sl 1, p to st before marker, turn, place marker on RH needle.
Repeat rows 3 and 4 until 14 sts remain between markers.
Short-row back
Row 1: sl 1, k to 1 st before marker. Slip this st to RH needle, remove marker. Insert tip of RH needle (from right to left) into nub below next st on LH needle. Put tip of LH needle into these 2 sts and knit them tog. (through the back) leaving the nubless st unworked on the LH needle. Turn
Row 2: sl 1, p to 1 st before marker. Slip this st to RH needle, remove marker. Insert RH needle tip into nub below next st. Put LH needle into the back of these sts and purl them tog. Turn.
Continue working these 2 rows until the last marker has been discarded. Turn,sl 1 and work to end of row, slipping last 2 sts back onto lace section. Now transfer 2 sts from the other end back to the lace section too, giving 30 sts on both sections.
Now you're ready to continue the lace pattern on the front of the sock from where you left off. I like to work with the lacey part just on the front for about 1/2" - 1" before starting the lace up the back of the leg.
The pattern is just the same:
Round 1(both needles ):k2, ( yf, sl 1, k2tog, psso, yf), * k3, (yf, sl 1, k2tog, psso, yf ) ; rep from * to last st, k1
Rounds 2, 3 and 4(both needles) : K
Work in this pattern until lace section at back measures 4 1/2".
Next round: k2, *p3, k3. Repeat from * to last st, k1. Work in this rib for 3/4". Cast off loosely.
Notes
This type of sock construction and the cast-on are described in Priscilla Gibson-Roberts' book "Simple Socks" and Wendy Johnson gives an excellent account of a toe-up sock although neither of these use an unwrapped short row like mine here.
Instructions are given for working on one circular needle. More information on this method can be found at http://www.az.com/%7Eandrade/knit/mloop.html
For the provisional-cast on see any standard knitting reference book or here
The no-wrap short rows are based on the method used in Oz Yarn's Easy Sock.
Knitting the "nub"
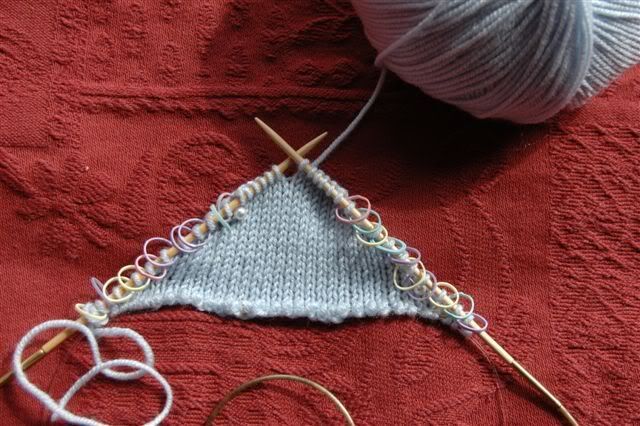 Half-way through the short row toe and ready to start to short-row back. You can see the 10 markers on each side and 12 stitches between the markers.
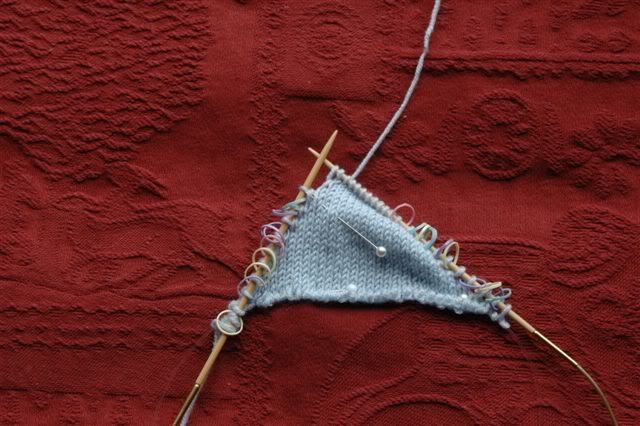 The last stitch before the marker has been slipped to the RH needle and the marker has been discarded. The pearl headed pin tip is just under the "nub"
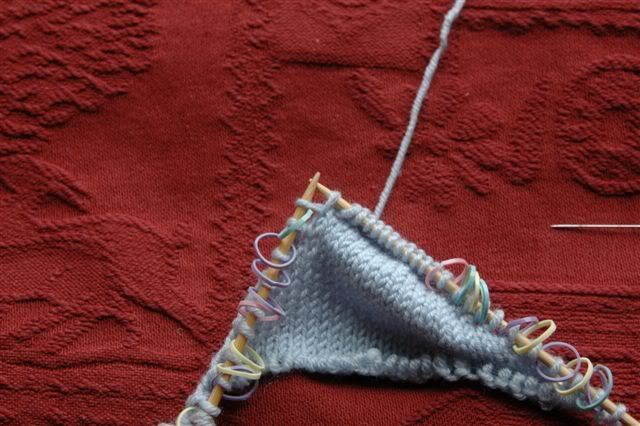 The "nub" is on the RH needle
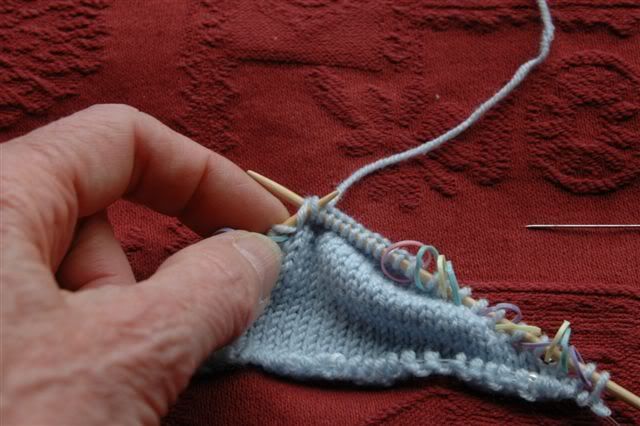 The "nub" and the slipped stitch are being knitted together through the back
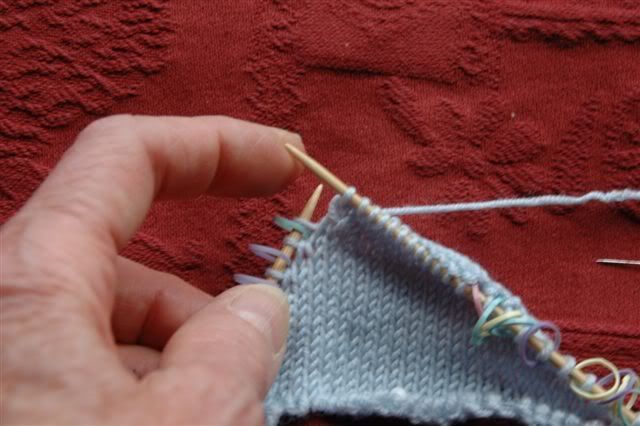 Knit 2 together has been completed ready to turn.
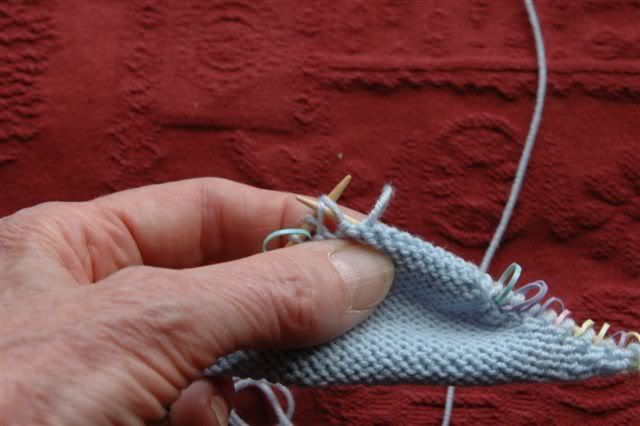 The "nub" and slipped stitch being purled together on a purl row
Since writing this I have found that although the sock construction is completely different, the lace pattern I used is the same as Karen Baumer's Simply Lovely Lace Socks in Interweave Knits Spring 2006 except she does "knit through back of stitch" where I just do "knit" but I took mine from this that I knitted for my daughter last summer
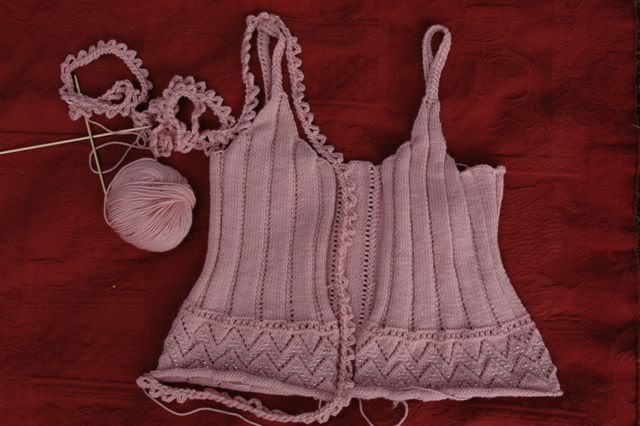
It is Sundae fromRYC Classic Holiday and I adjusted the stitches between the columns of eyelets to fit my sock.
1 comment:
I am knitting socks for the first time, beginning with a toe-up sock on the Magic Loop. All was well until I got to the heel. I became very frustrated trying to understand wrapped short rows. But then I discovered your easy-to-understand heel instructions. I love making the heel that way! Thank you!
Post a Comment